
best car door edge molding universal fit options are mainly about one thing: protecting your paint and the edge of your door from chips, parking-lot dings, and that annoying “metal-on-metal” contact when a door swings a bit too far.
If you have a daily driver, a new-to-you used car, or even a leased vehicle you want to return clean, door edge trim is one of those small upgrades that can save you from bigger cosmetic headaches. It’s also cheap enough that it’s tempting to buy the first roll you see, which is exactly where people get stuck.
The tricky part is that “universal fit” sounds simple, but doors vary in edge thickness, seam shape, and how the weatherstrip sits. This guide helps you pick a trim that actually fits, understand materials, and install it without peeling corners or trapped grit.
Key takeaways:
- Material matters more than brand names: PVC vs TPE vs metal-core trim behaves differently in heat and cold.
- Fit is about grip, not “one size”: measure edge thickness and check the seam style before buying.
- Prep makes it last: clean, dry, and warm surfaces reduce early lift and adhesive failure.
What “Universal Fit” Really Means (and Where It Fails)
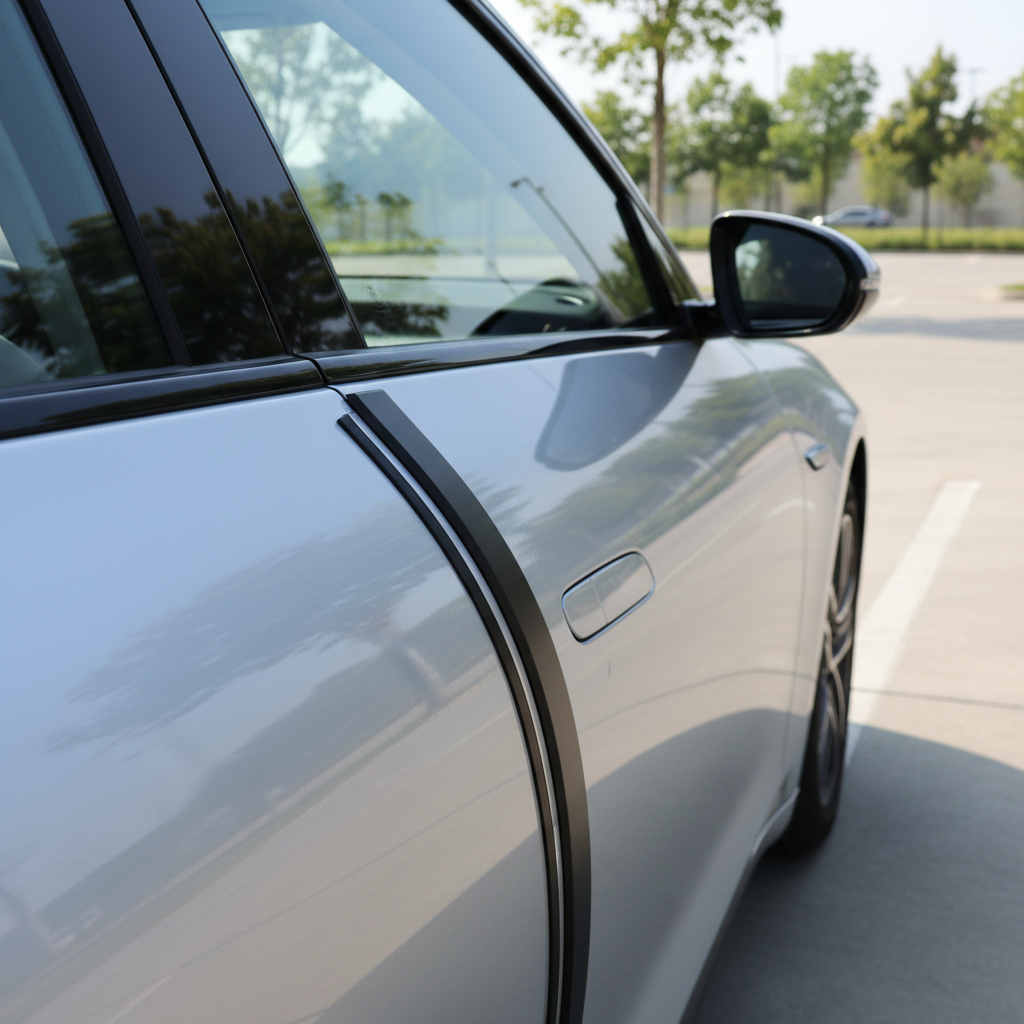
Most universal door edge molding is designed to clamp onto a typical door flange, basically the thin metal edge where inner and outer door skins meet. If your vehicle matches that common shape, it works great. If not, you’ll see gaps, loose sections, or trim that interferes with closing.
Common situations where universal fit gets complicated:
- Thicker door edges on some trucks and SUVs, where a slim U-channel won’t grip well.
- Tight door-to-fender gaps, where thick molding rubs and scuffs.
- Curvy door contours near the top corner, where stiff trim kinks or lifts.
- Existing factory edge guards or PPF, which changes thickness and adhesion.
If you’ve ever installed edge trim that looked fine in the middle but popped off at the top corner a week later, that’s usually a fit and flexibility issue, not “bad luck.”
Why Door Edge Molding Pops Off: Real-World Causes
People blame “cheap trim,” but failures usually come from a few repeat causes. Fix the cause, and even budget-friendly molding can hold up reasonably well.
1) Wrong channel size or weak internal grip
Many universal products rely on internal ribs or a metal core to clamp. If the channel is too wide, it never bites. Too tight, it deforms and springs back off curves.
2) Dirty edges and trapped grit
A door edge is a magnet for wax residue, road film, and fine dust. That grit can keep the molding from seating fully, and over time it can rub the paint. According to 3M (automotive adhesive guidance), proper surface cleaning is a major factor in tape and trim adhesion performance.
3) Installing in cold weather
Many plastics get stiffer in low temperatures, and adhesive-backed options don’t wet out properly on cold paint. In a lot of garages, the “it won’t stick” problem is really a temperature problem.
4) Bad corners and rushed finishing cuts
Door corners are where trim fails first. If you don’t warm and shape the curve, or if you leave a stressed cut edge, it slowly walks back and lifts.
Quick Self-Check: What Type of Edge Molding Will Fit Your Car?
Before you buy anything, do a two-minute check. This prevents the common mistake of ordering a thick, bulky U-channel for a door that has tight gaps.
- Door edge thickness: Is it slim like many sedans, or thick like some trucks?
- Gap clearance: Close the door slowly and look for tight spots near the fender and quarter panel.
- Edge shape: Is it a simple flange, or does it have a rolled/lipped edge that’s harder to clamp?
- Top corner curve: Is it a sharp radius that needs a softer material?
- Your climate: Hot sun, freezing winters, or both?
If you find tight clearances and sharp curves, prioritize a thinner, more flexible trim even if it feels less “heavy duty” in your hand.
Materials & Styles Compared (Use This Table to Choose)
The “best” choice depends on durability needs, climate, and how clean you want the install to look. Here’s a practical comparison for universal-fit products.
| Type | What it is | Pros | Cons | Best for |
|---|---|---|---|---|
| PVC U-channel | Basic plastic clamp-on trim | Low cost, easy to cut, widely available | Can harden/crack over time in extreme climates | Budget installs, mild climates |
| TPE/TPV (rubber-like) | More flexible, often better cold performance | Handles curves well, less likely to kink | Can look bulky if too thick | Curved door corners, mixed climates |
| Metal-core U-channel | Plastic outer with internal metal reinforcement | Strong grip, tends to stay put | Harder to fit tight radiuses, can mark paint if grit trapped | Long-term hold on straighter edges |
| Adhesive-backed edge strip | Sticks rather than clamps | Thin profile, good for tight gaps | Prep-sensitive, heat/cold can reduce durability | Very tight clearances, minimal look |
If your main goal is “set it and forget it,” a well-sized metal-core trim usually performs well, as long as you keep the edge clean during install. If you’re worried about tight gaps, a thinner adhesive-backed strip may be the safer choice.
How to Install Universal Door Edge Molding (Without the Usual Mistakes)
This is the part people rush, then blame the product. Give yourself 30–45 minutes for a full car, longer if you’re doing it in a driveway and want clean corners.
Tools you’ll actually use
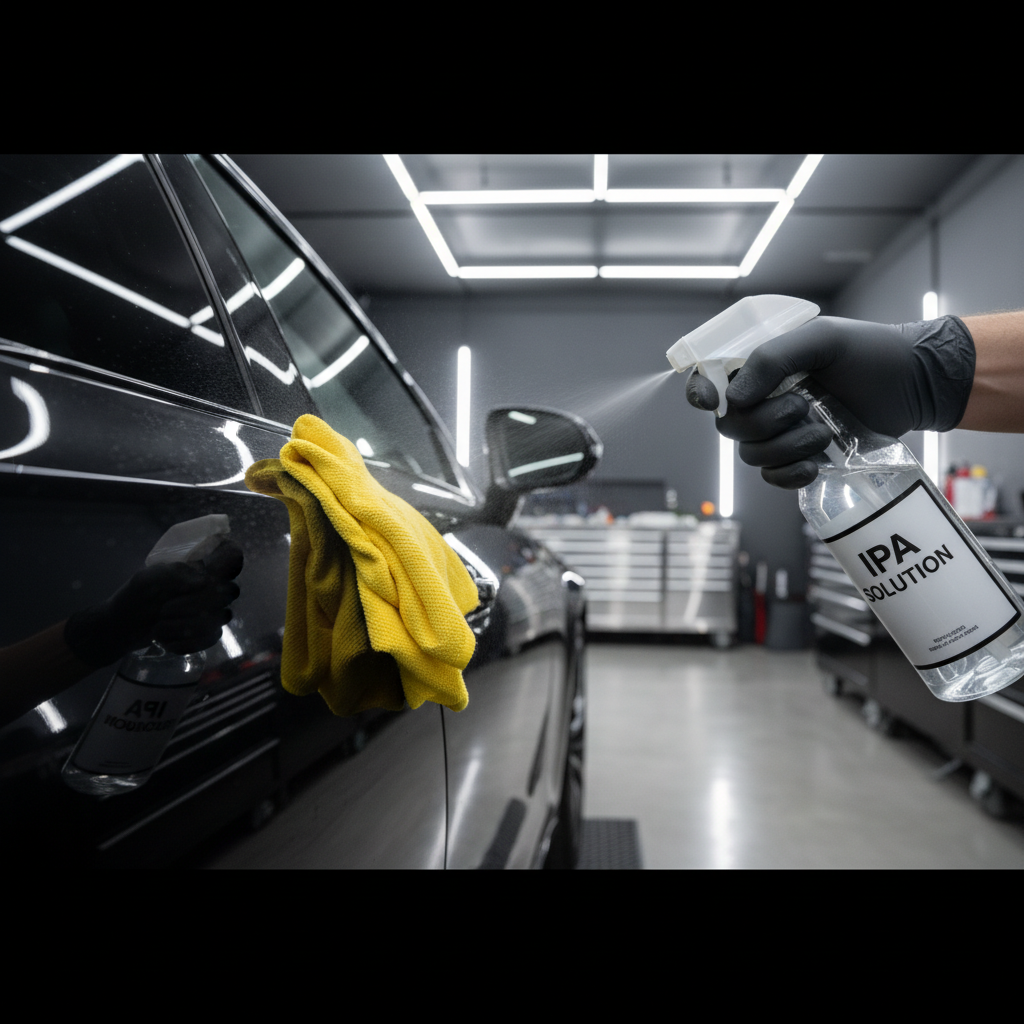
- Isopropyl alcohol (or a paint-safe surface prep)
- Microfiber towels
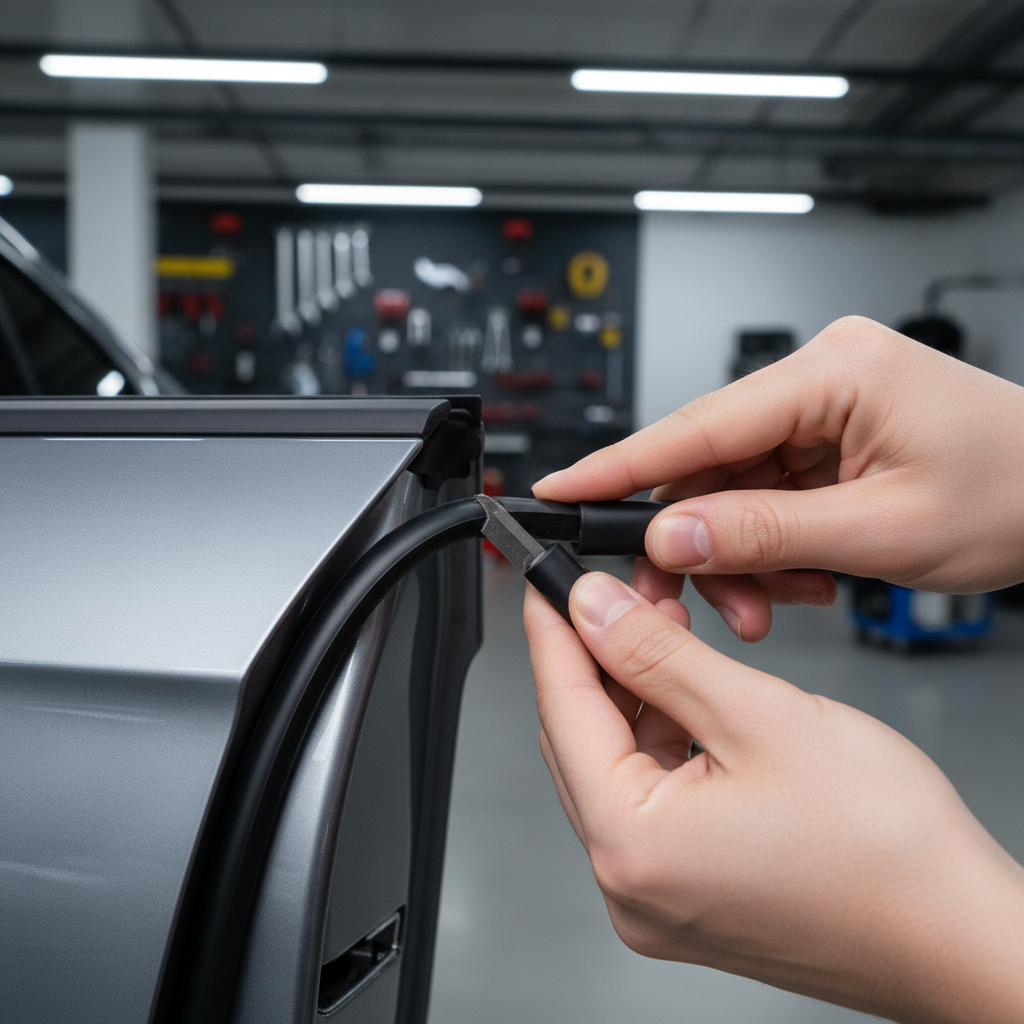
- Scissors or a sharp utility knife
- Tape measure
- Hair dryer or heat gun on low (optional, but helpful)
Step-by-step install
- Clean the edge with alcohol and let it fully dry, especially around the top corner.
- Test fit a short piece near the tightest gap area, close the door slowly to confirm no rubbing.
- Start from the top and work down, pressing the channel fully onto the flange as you go.
- Warm and shape corners with gentle heat, then press and hold for a few seconds.
- Cut slightly long, then trim to final length so the end doesn’t retract and expose metal.
- Final press along the full edge to seat the trim evenly.
With adhesive-backed styles, follow the same cleaning routine, then peel the liner gradually rather than all at once. The moment you stick it crooked, you’ll fight it the whole way.
Common Missteps to Avoid (So You Don’t Waste a Weekend)
A few errors show up constantly in “universal fit” installs. Avoiding them is usually more impactful than buying a pricier roll.
- Installing over wax or spray detailer: it feels clean, but it’s slippery for trim and tape.
- Using too thick a molding where the door gap is tight, it may rub and slowly peel.
- Forgetting the bottom drain area: don’t block any door drains or you may trap moisture.
- Stretching trim to force a corner: stretched material tends to shrink back and lift.
- Assuming all “chrome” trims match: finishes vary, and some can look off next to factory brightwork.
One more subtle point: if your door edge already has small chips, edge molding can hide them, but it won’t stop corrosion that has already started. If you see bare metal, consider touching up paint first, or ask a body shop what they recommend.
When You Should Consider Pro Help or a Different Protection Method
Door edge molding is DIY-friendly, but there are cases where a different approach makes more sense.
- Show cars or high-end paint: Paint protection film on the edge can look cleaner and less noticeable, though it costs more.
- Chronic rubbing issues: If molding rubs the fender due to alignment, a shop can check door alignment and gaps.
- Complex door shapes: Some doors have edges that simply don’t accept clamp-style trim well.
Safety-wise, anything that affects door closing feel should be treated carefully. If the door doesn’t latch smoothly after installing a thicker guard, remove it and reassess fit, or consult a professional installer.
Conclusion: Picking the Right Universal Fit Without Overthinking It
Choosing the best car door edge molding universal fit comes down to matching the channel size and flexibility to your door shape, then doing a clean install. Most “bad products” are really mismatched thickness or rushed prep, and those are fixable.
If you want one simple next step, do a quick test fit in the tightest gap area before committing to a full install. If that spot clears cleanly and the corner can be shaped without kinking, you’re usually in good shape.
FAQ
What is the best car door edge molding universal fit for most sedans?
For many sedans, a thinner U-channel with decent flexibility tends to fit well because door gaps can be tight near the fender. If the trim feels overly bulky, it may rub when the door closes.
Will universal door edge molding damage paint?
It can if dirt gets trapped underneath or if a metal-core trim is installed over grit. Cleaning the edge well and pressing the molding on evenly reduces the risk, and periodic checks help if you drive in dusty or salty conditions.
Is adhesive-backed edge trim better than clamp-on molding?
Adhesive-backed strips can be better for tight clearances and a lower-profile look, but they are more sensitive to surface prep and temperature. Clamp-on styles rely more on mechanical grip and can be easier to reposition during install.
How long does door edge molding usually last?
It varies by material, climate, and how well it was installed. Heat, road salt, frequent car washes, and door impacts can shorten lifespan, so it’s smart to treat it as a maintenance item you might replace over time.
Can I install door edge molding in winter?
You can, but it’s easier if the car and trim are warm. If you’re in a cold garage or driveway, warming the trim and the door edge gently can improve flexibility and adhesion behavior.
How do I keep corners from peeling?
Corners peel when the material is stressed or not fully seated. Use gentle heat to help the trim conform, avoid stretching it around the bend, and make clean cuts so the end doesn’t pull back.
Do I need to remove old edge guard residue first?
Yes, in most cases. Old adhesive or residue can prevent a new guard from seating properly and can create uneven pressure points that lead to lifting.
If you’re trying to protect a new paint job, keep a lease return clean, or just stop collecting door-edge chips, a well-matched universal trim is a practical weekend fix. If you want a more “factory” look with less trial-and-error, it may be worth choosing a kit that specifies channel size and material clearly, or asking an installer to confirm fit before you buy.